Showing posts with label PINned. Show all posts

Wednesday, December 4, 2013

that time of year.

our season of thanks is a week behind us.... and the wonderful season of hope and anticipation is now here.
I have been gradually taking out the fall leaves and pumpkins and replacing them with evergreens and lights.  it is the beauty in this moment that I love the simplicity of life we live.

our home is calm, and at times, so comfy that I snuggle in a blanket and never want to move.
a chill has taken over the skies, and the clouds are no longer around...
this morning it was 20 degrees and crystal clear.

today I am teaching my EcoThink Kids how to make salt dough ornaments....
and while I was looking around on PINTEREST finding a recipe and ideas~ I kept coming across these wonderful photos of coziness. 
www.granlibakken.com

Knit Cottage Slipper Socks. Free pattern here: http://lby.co/yF01uW

sinkorswimbaby.tumblr.com

 Ignoring the fact that I have to go out in the cold crisp air....
I think I just may stay in my wool socks and flannel shirt all day...

would you like to share this cup of cider with me?
cozy blanket, warm fire, coffee...just add a good book and crack the window on a perfect autumn day

Monday, November 4, 2013

canning it all

I did some massive canning this year.
PLUMS, PEACHES, CHERRIES,  APPLES, TOMATOES, BERRIES, ZUCCHINI...
you name it.... if it grew in our yard, it was made into some sort of JAM, BUTTER, PICKLE, RELISH, or SAUCE.

Some of the new canning recipes that I tackled were definitely ones that I want to use again....
I am sharing them here with you...
1. so you can try them.
and
2. so I don't forget them next year.
(Gosh, I love blogging!)
this was the summer of plums
most of our plums were made into jam and syrup.  Our tree does not normally bear fruit... but this year was the mother load.
The syrup is perfect on pancakes, or add onions and chili pepper flakes for a great glaze on chicken or pork.
The Canning Granny has all sorts of great canning ideas and recipes.  Her Plum Sauce is simple, sweet and just "plum" perfect!

For my Peach Salsa I used Allrecipes.com~ I usually use a minimal amount of jalapeno pepper... but this year, we had peppers growing out of our ears.... so we used them all (and boy, is this salsa a kick!)

How about some sweet cherry vanilla jam ~ which is amazing! Try this on some white chocolate scones... and you may just think you are having tea with the queen.

For the best applesauce... I used Pioneer Woman's simple recipe and ladled it in jars and froze it (leaving a head space!)  but to be honest, this gets eaten fast around here- so really, I didn't need to freeze it.  

For a simple canning tomatoes I went to the good ol' Martha Stewart . Even for Martha, this was so easy!  The hardest part was peeling and seeding those darn tomatoes.... but just crank up the Vampire Weekend Station on Pandora and you are set for an "a peeling" afternoon.

My Peach Butter recipe was light, and springy... the lemon just takes the peach and brightens it up.  Where as my Apple Pear Butter was much more "spice" than I would have liked.... but this jar gets opened and you feel like you are enjoying Christmas.  note to self- use less nutmeg and clove.  Unfortunately these recipes are out of one of my favorite canning books the  HOMEMADE LIVING: Canning and Preserving with Ashley English  which you can find online or in your local library.
We use her garlic dill pickle, canned peaches and pickle relish recipe from this book as well.  Her book is really simple to follow and I love the variety of recipes.  Check it out... when you get the chance.  you wont be disappointed.

Wednesday, July 3, 2013

Orange you glad

I finally did it.
I went orange.


I have been longing to paint my front door a different color for a long time.... Actually, since we moved here 9 years ago.  In California, we had our door a cherry red color (with the exterior paint colors of  light blue with medium blue trim).  I loved it, the red was just perfect.

Here our house is a light grey with white trim and the door was a dark blue.  I liked the dark blue, but it just didn't quite do it for me.....it did look nice.  A few years back I found this photo online via Better Homes and Gardens and PINNED it for later.  Then I came across this photo of an orange door  with a dark grey exterior- and knew....this was the route I wanted to go.  PINNED it for later, again.


I bought the perfect color of paint Benjamin Moore's Soft Pumpkin (its a smidge softer of an orange than the photos~ but perfect for me and my little door!). It was $7 for a sample can, which was plenty for 3 coats on a door.
We waited for a blazing hot day...which came, without fail.  Took the door down and painted one coat of primer, and three coats of orange.  A few hours later- a door of orange was hung.  And my heart sung with happiness.  taa~daaa!

Now, when we have the budget to paint the whole house a dark grey....  but until then, this simple change made a huge difference.
feeling the love for the orange!!!!
(oh by the way, please dont tell me its peach.... Its NOT peach!)

Monday, February 11, 2013

"oh my" cookies

you will never guess where I got this recipe....
oh wait, maybe you can guess...
where have I been getting EVERYTHING... lately!

PINTEREST again... yes, I know.
but once again... the search for things sweet, tasty and amazing... all get generated through this site.

This sweet treat was from Food Blog STICKY:GOOEY:CREAMY:CHEWY and her recipe for HolyCrapAmazingCookies was one that I just couldn't pass up.  This past weekend I was in the role of Single Parent ... and we planned to hang out with some friends Saturday night.  I wanted to bring along something that everyone would likely enjoy.  This is where this recipe came in.  By the way.... the given name says it all!!!

They were super yummers!
Both boys loved them.  I made them with Gluten Free Cornflakes (which were SUPER HARD TO FIND!!!!) and mini marshmallows for an added goodness.  With my youngest on board with these balls of "goodness me" tastiness... I knew they could be brought along to share with others.
Lets just say... They were a hit!

seriously- make them! You cannot go wrong.

yield 1 1/2 dozen

1/2 cup of sugar
1/2 cup corn syrup
1 cup of  creamy peanut butter
3 cups corn flakes ( we have GF ones)
1/2 cup mini marshmallows
3 oz. dark chocolate (melted)


  • pour into medium size bowl flakes and mini marshmallows and set aside.
  • on low heat mix together the sugar and corn syrup and bring to a full boil.
  • remove from heat- and add-in peanut butter.
  • once sugar and peanut butter and melted and blended~ pour over dry mix of flakes and marshmallows.  Be sure to mix well and coat all the flakes.
  • with a spoon or cookie scoop ~ roll into 1-2 inch balls and set on parchment paper.
  • drizzle with melted chocolate.

let cool... or at least rest for a few minutes (if you can!).  and ENJOY!
trust me, you will be camped out at the table for a while as you lick your fingers with a smile!


Monday, February 4, 2013

a day of hearts...

its time to start thinking valentine's day cards.
With a 4th grader~ I know that this will soon come to an end for one of my boys....
do they give out valentines in Jr.High???

You know me,
I don't like to spend money on cards... I will buy everything else "hearts" worthy, but for cards~ I like to make my own.  I know, logically, it makes no sense.... but~ its how we roll here at the homestead~ completely senseless!

once again, PINTEREST has saved the day....
seriously people, it is a love hate relationship with that site.... love because you find all theses amazing things ....hate because you find all these amazing things!  The time seems to fly as you "play" around looking at weddings ideas (and I'm already married!).

back to our Valentines.
for O~ we found some free star wars ones... that are 4th grader worthy!  Who knew that boys could have such an opinion on cards... but I showed him three different ones, and he said these ones were the "coolest".  I have to admit~ they are pretty awesome!  We added an additional "rebel seal" on the back to make it "authentic", cut them out... and now we need to sign and distribute! You can find the link to AleciaDawn Photography and her Star Wars awesomeness here.


for B~ since he cant really have candy (or should I say.... most candies) we went with a sweet little playdoh valentine found at SUPERMOM here .  They say "YOU BETTER SHAPE UP.... MY HEART IS SET ON YOU"
and sadly,
I am going to say this....
sadly, the entire time I was cutting and filling the paper bags I was singing this song.


oh wait... what's that.... Your gonna be singing it now... for the rest of the day.... whoooppssie!
my bad!  Have fun with that!
"your the one that I want.... your the one I really want... who hoo hoo... honey!"


Tuesday, January 29, 2013

a tisket a tasket

I asked for a basket.

Tomorrow is my birthday, and I asked for one of those big garden baskets.... you know...like these ones that you can get at Lee Valley

these baskets are great because you can pick your veggies, and then hose the dirt off while they are resting still in the basket.  Its great~ no more bringing in dirt to the kitchen sink while you rinse your veggies.

there is only one problem- these babies are $50.

NEVER FEAR~ PINTEREST IS HERE!
I found that I had PINned a DIY on making one a few months ago.  The DIY was through runnerduck.com  and I showed it to the hubby to see if he could work his magic.
 Of course...you know he can... especially if he made my closet shelves and the kids' tree house...
The DIY is for a small basket,but the great things is~ you can make it your own.
The hubby said he made it for less than $10 and it took him less than 2 hours to put it all together.


and its huge!
and gorgeous!
I must say I feel like the luckiest girl in the world.... my husband says I'm pretty easy to please.  its a Win~Win for both of us.


Tuesday, January 22, 2013

We CAN!


we need this printed in our house... as a constant reminder that we can~ and always can!

Thursday, December 6, 2012

oh deer....


I found a photo on PINTEREST of a deer and pine cones on a winter windowsill.... and I borrowed the idea.  So with pine cones from our yard and a male and female deer purchased from our local toy store~ I had the makings of a cute window scene.

then something started happening.....
the deer were moving.
I started wondering who was the culprit of the moving deer... and realized it was both littles.
One liked them facing this way.
Odin thinks they should be kissing
The other liked them like this.
Bjorn thinks they should be looking out the window
I am beginning to think everyone has an opinion around here!

Wednesday, September 5, 2012

the Back To School Bug


no.. no... I'm not sick....
but, I have this uneasy feeling....
much like the one I get when things just seem out of place.

you know... the declutter/ cleaning bug... That seems to posses me at times.
I went back to last year's posts... and I found that the bug hit me then... too.
I decluttered and super cleaned the kids rooms~ just before school started.

but, this year.... today, even....
its like I need to ransack the whole house.  Especially the bathrooms.  Sadly, the bathrooms gets the most neglected (and the dirtiest) when the kids are home for summer.

The bug hit me... and hit me hard... last night.
O's room~ needed some serious TLC.

So I moved his bed, dresser and shelves. Wiped down his walls and base boards.  Washed all bedding and curtains.  Got rid of (at least) a bag full of things he calls "stuff" but I tend to call "crap" (sorry mom, the real word that I would have used... probably would have offended you even more!).  Pictures will be posted tomorrow (when all is complete and finished... still some small bits and pieces to do).

Today~ I am tackling a top to bottom bathroom scrub! (using some great Pinterest finds)
I plan to use this recipe for the "boy smell"  around the toilet
along with this homemade soft scrub recipe for the grime and goo in the toilet and around the sink.

I'm going in....
wish me luck!


Thursday, June 7, 2012

"Your WHAT!?!?!"

I heard it....
last week.
He said it loud and clear.....
just the day after his birthday party....
he said the dreaded words of summer....
and he still had 1 1/2 weeks of school.


I'M BORED!
my sassy self thought of wiggling my shoulders and waving my finger "oh, no you didn't...you didn't just say that....!"

but I knew~
I knew it wouldn't be the last time I heard it either...

That is when I realized I needed to be certain to have a plan in place for summer.  So I began to search.... (Pinterest, of course!)... and found this great blog~ ShabbyBeachNest and her idea for an "I'm Bored" Jar.  Now, of course- her tongue depressors are amazing~ and they look like  A LOT of work. But I took her idea, and simplified it.  I printed out her ideas, added some of my own, and cut them out.  I, then, rolled them up into small scrolls... and popped them into a jar.
Decorated the jar.
and now... I am ready.
armed with the tools for the next time a little voice says "I'm Bored"

::side note::
some of the tasks are things for the kids to do on their own, and some are for us to do together.  I know that if I am to make this a successful craft~ I may have to stop what I am doing... and participate.  So, if you intend to do this, you too, must realize that sometimes we have to stop what we are doing~ to be sure that a follow through happens.


Saturday, June 2, 2012

a simple Lego Party

 Odin turned 9 this week and his request for a lego party was granted... without all the bells and whistles that I normally pull out for  a birthday shindig.  Trust me, I had many times where I had to show restraint.... but, I did it. Simple. Nice. and Legos.  Just what the boy ordered.

Pre party set up was easy.
I had Odin get all his legos together into a tote and we brought them all downstairs.  I used the circle garland that I made for Bjorn's rainbow party and decorated the house... but added a little lego guy print out to some of the garlands.  I also used the lego guy cutout to put on the gift bags to send home.  Inside the gift bags were a lego creator 3in 1 set ($2.99 through Amazon!!! can you believe that!!!) and some candy treats.


The Lego guy print out was a free download from Winks&Daisies Blog, whom I found through Pinterest.
I filled up a few vases with legos and set them up on the food table and throughout the house.

I had three games planned.
GUESS HOW MANY  I filled up a large round glass container with legos and each child had to guess how many were in there.

WHO MADE WHAT  with 5 minutes on the timer ( and the birthday boy out of the room), each child had to make a creation.  When the time was up, Odin came in and looked at the creations and had to put a name tag by the creation he thought was made by that person.  (the hardest part of this game was encouraging the kids to not share any information about how build what)... The kids loved this game.  It was hilarious as the suspense built each time Odin got one right or wrong.

BUILD IT  (this one was the last 20 minutes of the party- which has kids quietly focused and entertained while parents came to pick up)  They got to open their gift bags and make the creator from their gift bag.  The first person to finish... won(nothing!).

The food was all Odin's choice~ chips, cookies, carrots, strawberries and pizza (all crap food but easy stuff!)
the cakes were cupcakes in the shapes of legos (my mom had the form, and I had to figure out how to frost them... possibly the hardest bit of this whole party).
I also had drink boxes for the kids and they were wrapped like little Legos that I used a free printable from DeliaCreates Blog, whom I also found through Pinterest.


Fun Times!!!!
Who Made What game
Birthday boy's role in Who Made What game
foodies


gifts
birthday boy
Most of the guest walked home from school with us... I felt like the Pied Piper.  When they got there they were on their own most of the time.... the easiest party EVER!!!

Wednesday, May 9, 2012

gardening boy

tis the time of year...
where the winter fades and the spring gardening gets started.
This year we have another little helper alongside the hubby and I....
B has decided he wants to "help" plant beans.

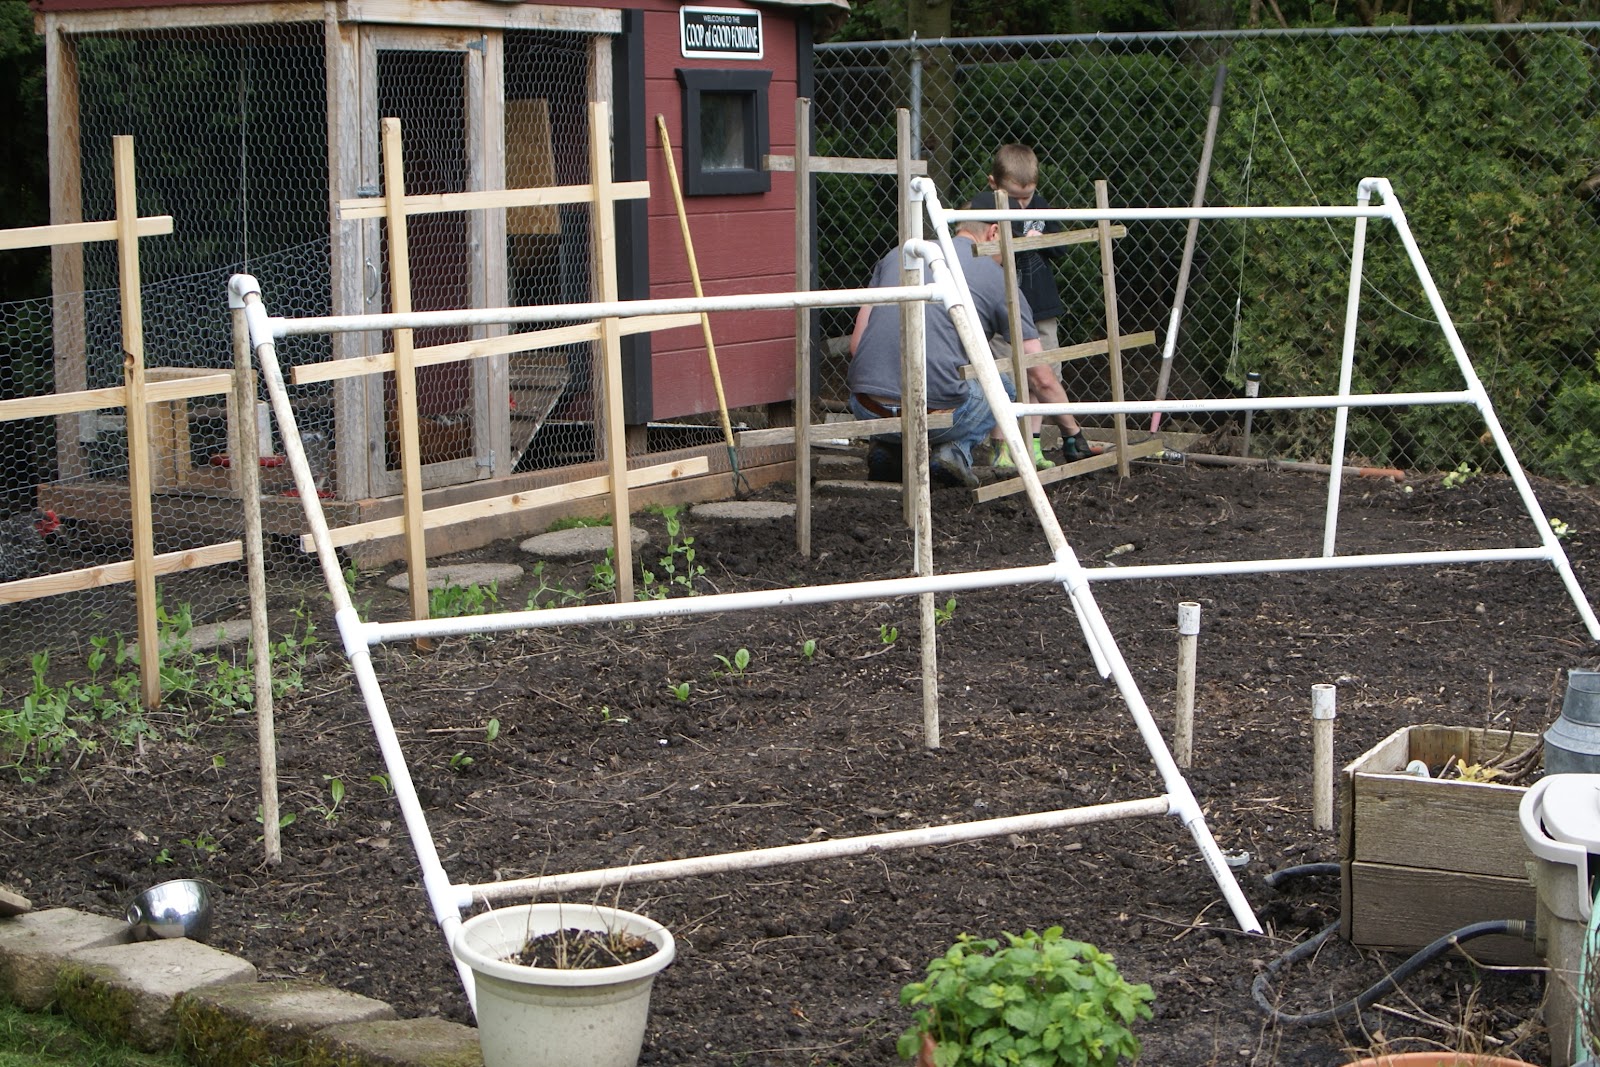
This weekend we built two shade trellises for cucumbers to grow up and for lettuce to grow from under.  We used PVC pipe so that we could dismantle it and reuse it each year.... and once the starts come forth we will use garden wire to train the vines to trellis.  Much like this one....

see what we did!
the cucs will grow up the PVC, and
the lettuce will grow from underneath
The chickens have been given their little space around the coop in the back of the garden... but one little devious one- keeps finding her way out (even with her wings clipped!)... she continues to keep us on our toes.
the sneaky one!
So we have gotten our starts out from the greenhouse and have given them space to grow.  Carrots, onions, spinach, tomatoes, beans, peas, lettuce, cucumber, zucchini, squash..... and herbs.  Oh goodness!!!! It is Spring!
peas~ yummers!
devious garden destroyer #2

Monday, April 23, 2012

Teacher Appreciation

its that time of year when one reflects on the people who love on our kids...
who educate them....
become a key part of the village that helps in raising them.

Our Teachers.
This year I bought these clear cups with straws and attached a card saying
"thanks!  our cup overflows with appreciation"


of course... I am not the original creator of this idea....
but it was PINned from this blog

I changed the saying.....
and didnt fill the cup with drinky things....
but, colorful tissue made a nice touch!

pretty cute~ I'd say!

makes me want to go back to teaching.....
(ummm... I dont think so!)

Thursday, April 12, 2012

SPRING CLEAN ~ Day 3

remember.... I started spring cleaning (day 1 and day 2).
well, it had been spring break, and the birthday party and Easter.... things got pushed back.... and we are now back into full swing SPRING CLEAN mode.

how many of you have a closet under your stairs?  how many of you use that space for a "catch all"... where it holds all the stuff for quick cleanups before company comes, postal boxes you don't know what to do with... and all those things kids bring home/ I can say I also hide things in there for other events or occasions.....
well, that is what I use my closet for ( I am confident~ I am not the only one!).... I rarely see the floor.

so the before photo.... didn't get taken... lets just say~ the piles of "stuff" went pretty high.
Ideally I would love this space to be used for wine, onion/potatoes, canning goods and table linen storage.
similar to these two photos (PINned,of course)


but this is what I did do.....( until my handy hubby can build me shelves!)
 cleared it out... (there is a floor!)

I made a spot for winter stuff ( those two brown fabric totes hold winter clothes, umbrellas, and blankets) so that when we are certain that winter is no longer with us... they will go up into the attic.... until next year.

I made a spot for the boys to hang backpacks, jackets and a reminder white board for me to write things for them to take to school.... today Bjorn had library and Odin had golf.
I hope this space can become more functional for us..... usable. accessible. a simple place for daily things.
can I cross my fingers on that???

now onto the guest room.